Changing Server Name
The Server Name is a value (usually a subdomain), which uniquely distinguishes a machine on the Internet. This value is called, in technical terms, Fully Qualified Domain Name (FQDN).
When you register a server with MaadiX, you can choose a name for your machine, to which by default we assign a subdomain of maadix.org. So, for example, if the name you have chosen is ‘myserver’ the full name of your server will be ‘myserver.maadix.org’.
Remember that the machine name cannot be changed, consider it well when you register the server.
MaadiX takes care of creating all the necessary configurations for the server to work properly. This includes not only the system settings, but also the DNS records needed for the newly created subdomain. Without these DNS records, the server could not function properly.
We have chosen to implement this form to simplify and speed up the process of creating the servers, however, you may decide to stop using the ‘maadix.org’ subdomain we have created, and use instead your own domain.
On this page we explain how you can change the main domain associated with your server through the control panel and all the parallel actions that you will have to carry out in order to change it successfully and ensure all the services work correctly.
Before you start
Let’s use myserver.maadix.org, as an example of a current name, assigned to your server.
This value is the FQDN of your machine and is composed of two parts: myserver [Machine name] , and maadix.org [Associated domain].
Before proceeding with the change, please note that the value “Machine Name” (myserver) cannot be changed. You can only change the value “Associated Domain”. So, for example, if the domain you want to use from now on is “example.com”, your new FQDN will be “myserver.example.com”.
The first step to proceed will be to create the subdomain myserver.example.com on your domain provider, with its corresponding DNS records.
DNS Configuration
This is the most tedious part of the process, but it is essential that you carry it out correctly and before proceeding with the change from the control panel.
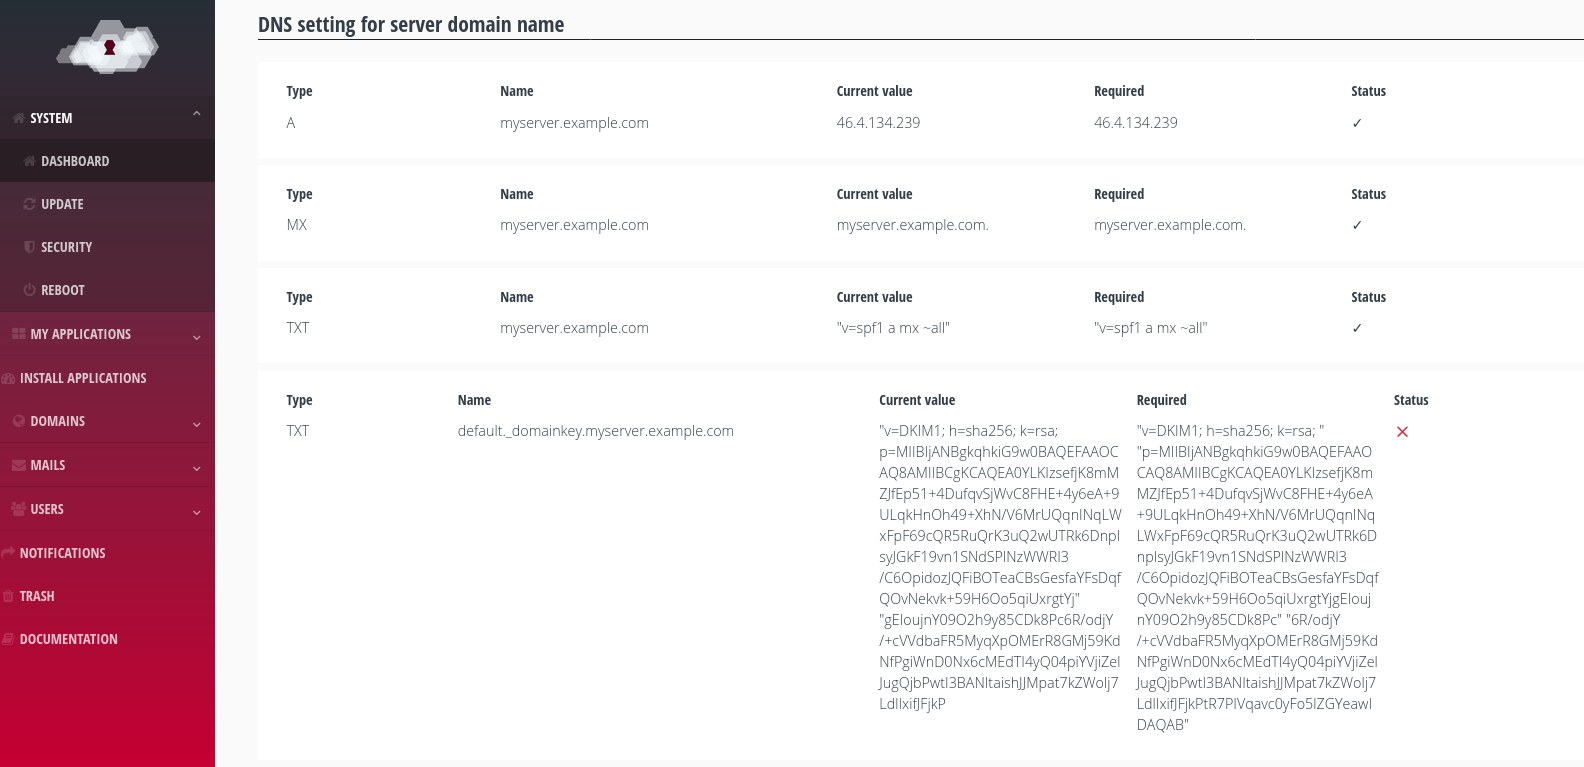
You will have to configure these settings from the DNS Zones management panel of your domain provider. The required records and their values are as follows:
Type |
Name |
Value |
|---|---|---|
A |
myserver.example.com |
IP.OF.YOUR.SERVER |
MX |
myserver.example.com |
myserver.example.com. |
TXT |
myserver.example.com |
“v=spf1 a mx ~all” |
You will have to replace myserver.example.com with the new subdomain (machine name + domain you want to use), and the value IP.OF.YOUR.SERVER with the real value of your server’s IP.
Once the changes have been applied, we must wait for the new configuration to be propagated through the Internet. This process can take from a few minutes to several hours, depending on your domain provider. The control panel integrates a check system, so it will not start the change process until the DNS is propagated.
There is another DNS record you will need to activate, instructions for which are below. This is the DKIM record, which consists of the value of a key that is generated during the process, so you can only activate it once you have completed the steps described below.
Change in the control panel
Once the previous operation is finished, access the control panel and go to System -> Dashboard, at the bottom, click on ‘Change server domain name’.
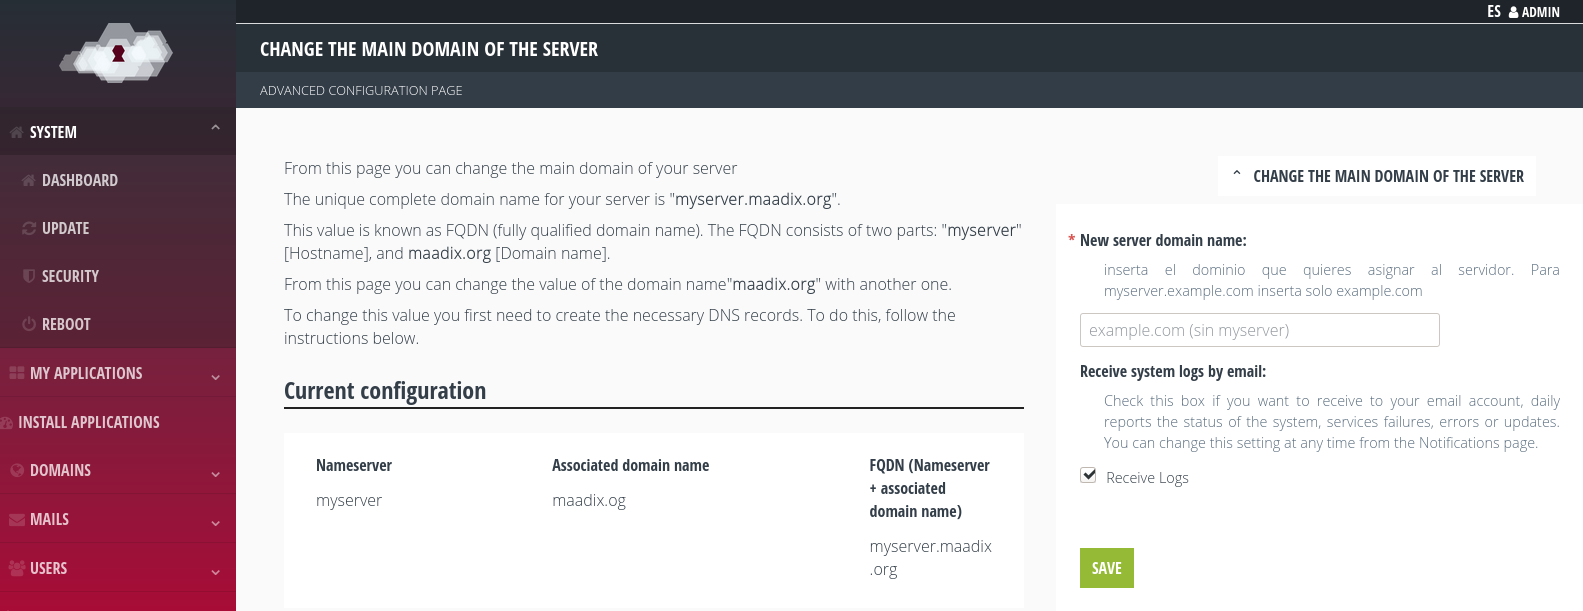
Change Server Domain Name.
This will open the page to proceed with the change, which includes instructions for the configuration of the DNS and other warnings to take into account. We recommend that you read all the instructions carefully.
Remember that you can only change the domain associated with the server and not the name. Following the example ‘myserver.maadix.org’ can be changed to ‘myserver.example.com’ or ‘myserver.example.net’ but not ‘newname.example.com’.
The process is extremely simple. You only need to insert the new domain you want to use (for example ‘example.com’) in the form that is displayed when you click on the drop-down ‘Change server domain name’.
FQDN Change Form.
Additionally, you can check the ‘Receive Logs’ box. This will allow you to receive to your email account, daily reports on the status of the system, service failures, errors or updates. If this option is not activated, these reports will be sent to an account to which the MaadiX technical team has access, so that they can be consulted in the event of errors.
You can change these settings at any time from the ‘Notifications’ page.
Before starting the process, the system will check that the necessary DNS entries are created correctly and if so, will proceed with the change.
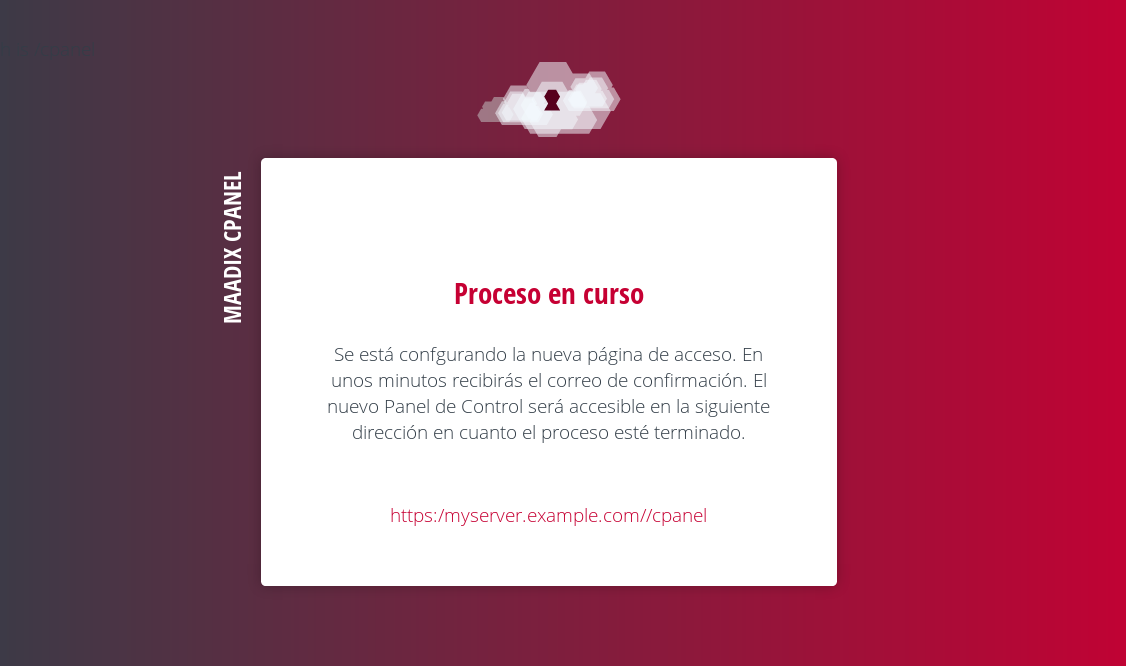
This operation is a little longer than other administrative tasks, since several services and packages present in the system have to be reconfigured. Please be patient.
Once the process is completed you will receive a confirmation email that will include the new address you will need to use to access the control panel:
https://myserver.example.com/cpanel
The old link will no longer be valid.
Message during the process.
Setting up DKIM
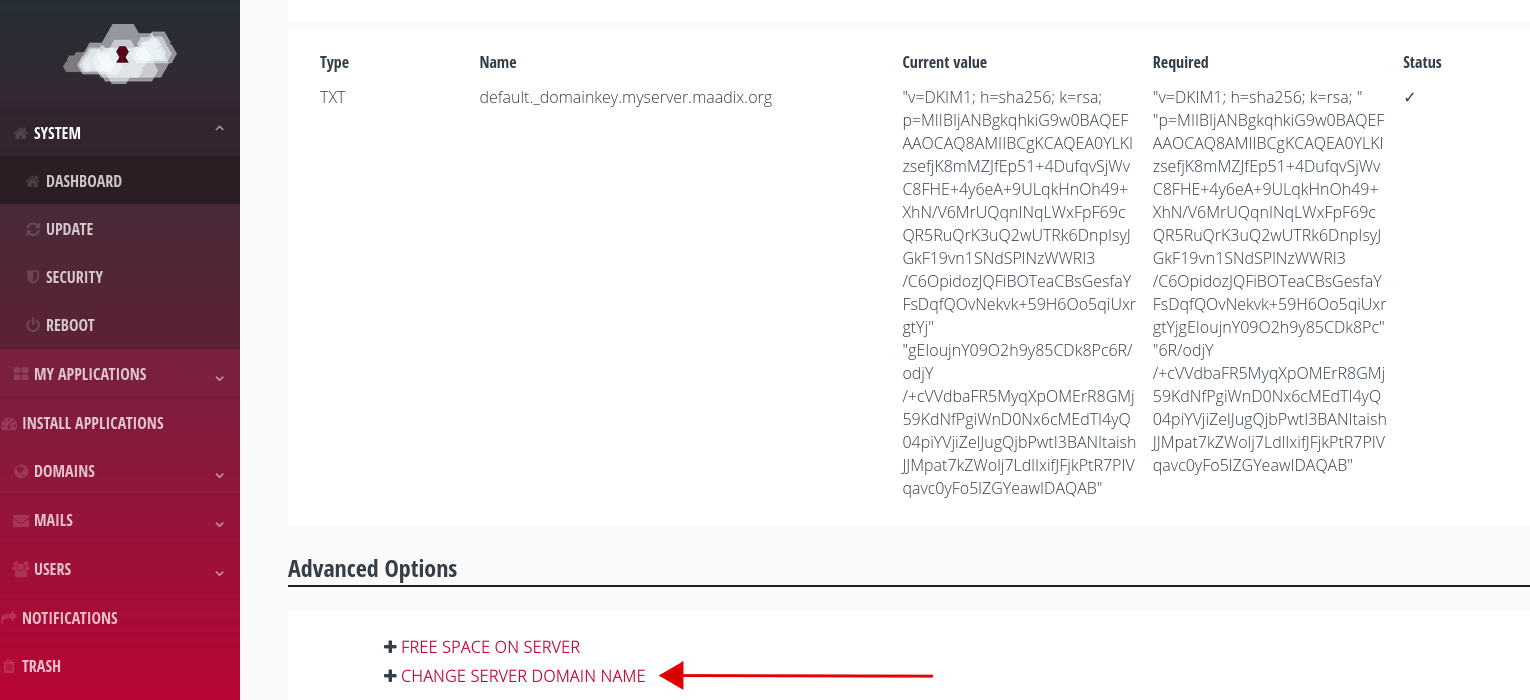
It is very important that, once the change is complete, you add the DKIM record to the domain’s DNS, from the DNS management panel provided by your domain provider. This record ensures the identity and legitimacy of the emails sent from the server, so it is essential to prevent your messages from being treated as SPAM.
The first thing you need is to know what the correct values are for the DNS entry. This information is now available in the control panel, on System -> Dashboard, in the ‘DNS setting for server domain name’ section.
The DKIM record is a TXT record, whose name and value you can copy from the table. When you look at it, you will see a red cross in the column ‘Status’. This means that there is no match between the required value and the value found.
Required DKIM.
The configuration of the DKIM is the most complex and the syntax may vary depending on each provider. In this link you will find a detailed explanation of its functioning and configuration, as well as a tool to check that the DNS entry inserted is correct:
When you are done, and once the DNS has propagated, the same table will return the values found for the DKIM record. If they are correct, the text that was previously marked with a red cross, now it will have been turned to a green tick, signaling the success of the operation.
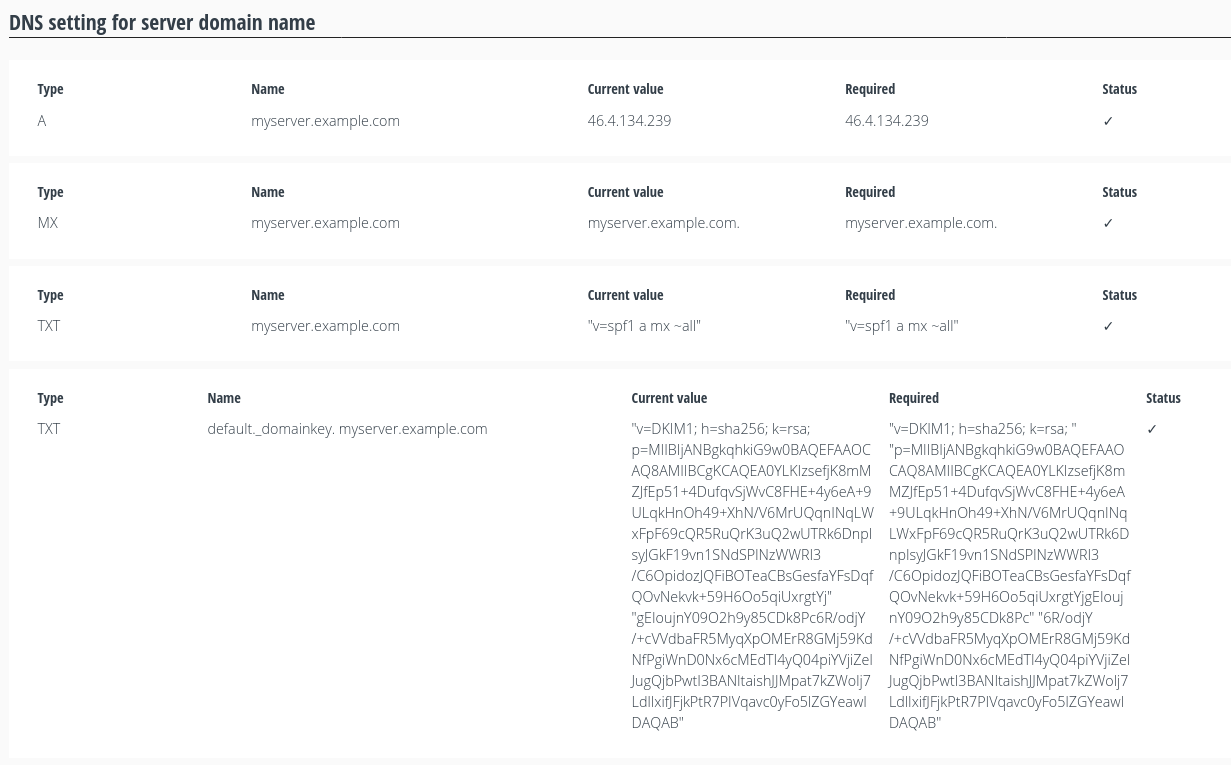
DKIM set correctly.
Final steps
Email
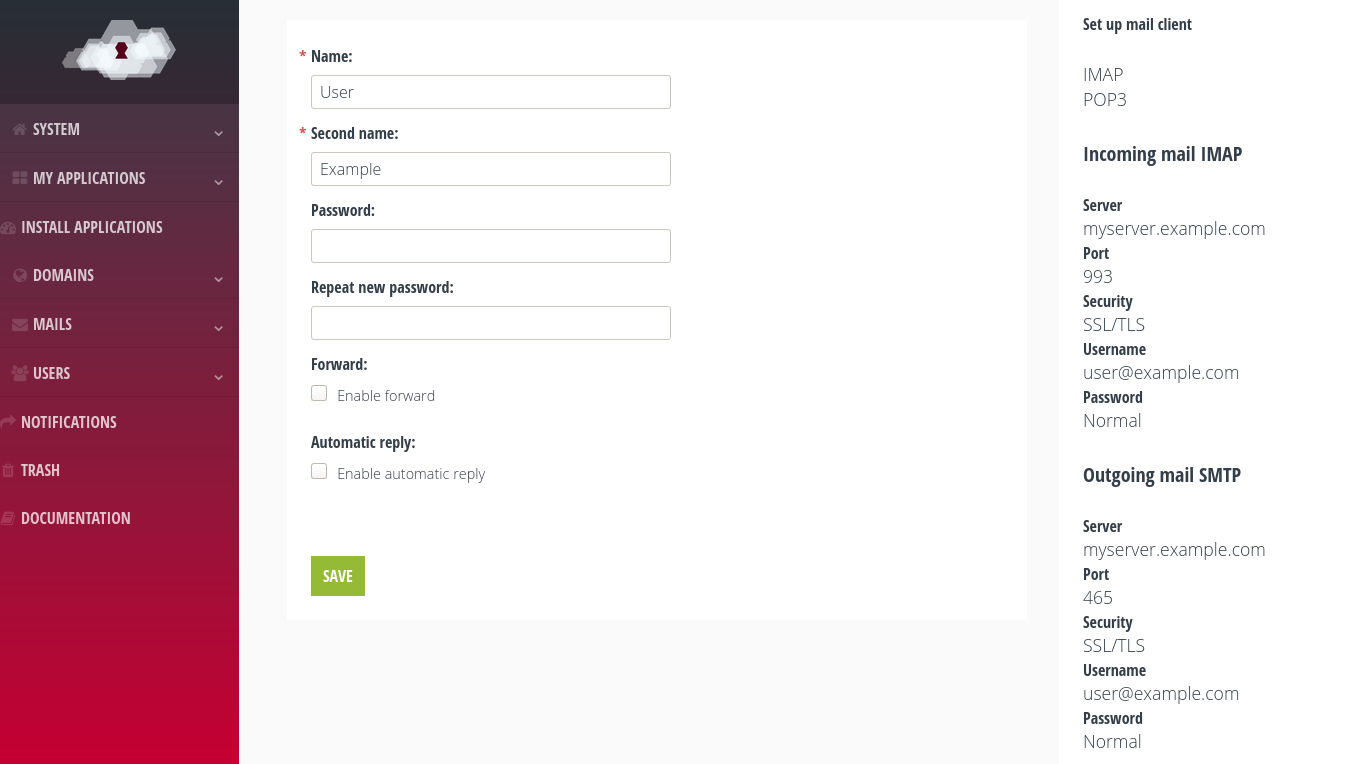
If you are using an email client on any device (Thunderbird, Outlook, k9…) you will have to change the value for the incoming and outgoing email server, and replace it with the new one. You will find the new settings in the email accounts edition page of the control panel.
New settings for mail clients.
VPN
If you have any VPN account activated, you will also have to reload the configuration in the client you use for the connection, since the certificate has been modified, and the previous one will no longer be valid. You can go to the edition of the VPN account and mark ‘Send instructions’ so the new connection instructions will be sent (including the files with the new configuration).