Domains
First step: get your domain
Every website or application needs a good domain name. If you already have your own domain, MaadiX allows you to activate it easily and to configure it for your applications.
If you don’t have your own domain yet, here are some sample providers where you can easily register it (but there are many more!):
We know that choosing a good name isn’t always easy. That’s why, while you’re deciding what your domain name is going to be, you can still use MaadiX and most of its applications by using https://MyMaadixServerName.maadix.org, where ‘MyMaadixServerName’ matches the name you chose when you purchased your MaadiX server.
However, some applications such as Jitsi Meet, RocketChat, Only Office Online, Collaborate Online, Discourse, Mailtrain as well as the email server and mailing lists can be used only if you have your own domain.
If you already have your own domain, follow the instructions below to activate it.
Remember that MaadiX is not a domain provider and does not offer a DNS zone editor.
Activate your domain
Usually you only need to activate domains for web pages, web applications or emails.
For Jitsi Meet, RocketChat, Only Office Online, Collaborate Online, Discourse, Mailtrain you don’t need to add the domains in the control panel, just indicate them in the required field for installation, as shown here. In the case of mailing lists, it is necessary to add the domains through Mailman, as described here.
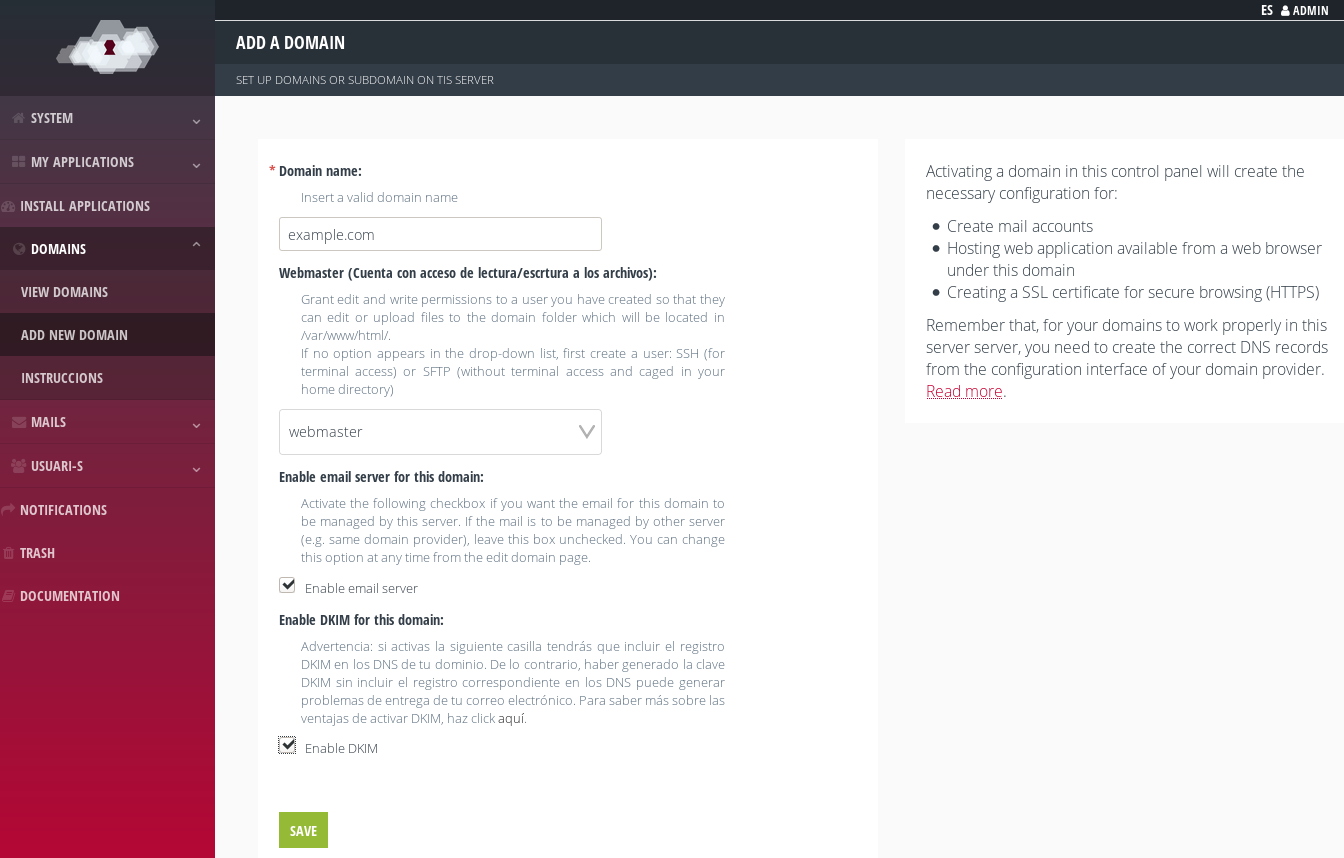
To activate a domain you have to go to your control panel, to the section ‘Domains’ -> ‘Add a new domain’.
A form will be displayed with the following fields:
Domain name: enter the full name of your domain or sub-domain (for example: example.com or docs.example.com).
For each domain or subdomain you activate, a folder will be created on your server located at /var/www/html/example.com/. You must upload your website or application to this folder so that it is accessible from the browser by visiting example.com
Enable mail server for this domain: If you want to use the internal mail server for the domain you are creating, this option has to be enabled. Otherwise, if you want the email to be managed by another external server, leave it off. You can change this option at any time from the domain editing page.
Webmaster: you can assign a webmaster account (web administrator account) in each domain or subdomain that you activate in MaadiX.
Any regular account to which access has been activated by SFTP only or by SFTP and SSH can be a webmaster. Clicking on the drop down ‘Assign Webmaster’ will list all regular accounts that can be assigned as a webmaster.
Adding a domain
If you don’t see any, you will have to create one first from the section ‘Users’ > ‘Regular accounts’. Here you can read more about the regular accounts and what SSH and SFTP access involves.
The webmaster account will have permissions to create, delete or modify files within the /var/www/html/example.com/ folder, where you can create the web application.
Remember that from version 201901, to avoid security breaches, the Superuser account can no longer be assigned as webmaster.
Configure the DNS to point to your server
Your server includes a system that automatically checks if your domain is pointing correctly to your server. If it is, the system will proceed with the creation of all the necessary configurations. If this is not the case, it will periodically repeat the same check until an affirmative response is obtained. To find out if the domain activation and configuration process has been successfully completed, check the Web Server icon on the View Domains page. If the icon is in green (Activated) the configuration to be able to create a web has been carried out satisfactorily.
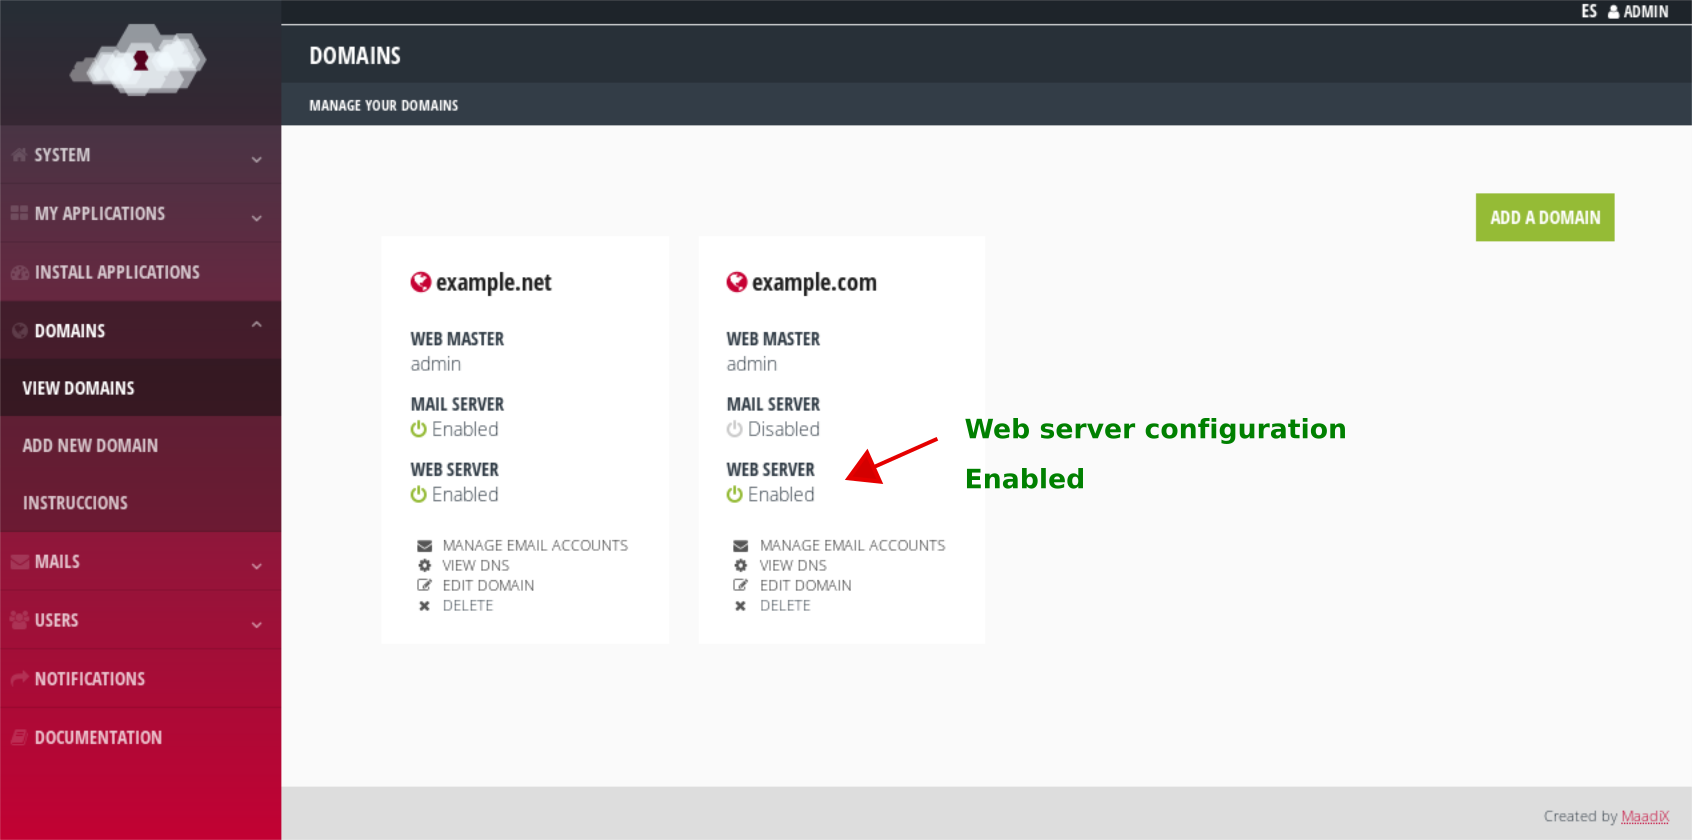
Web server enabled
In order to have your domain pointing to your server, you must modify its DNS. DNS (Domain Name System) servers are those that transform domain names, designed for human understanding, into numbers that correspond to the IP addresses of the different machines connected and publicly accessible on the Internet.
By clicking on “View DNS” in the column of your domain, you will find the settings required to make your domain work for both your web application (A Record) and your mail server (MX and SPF Records).
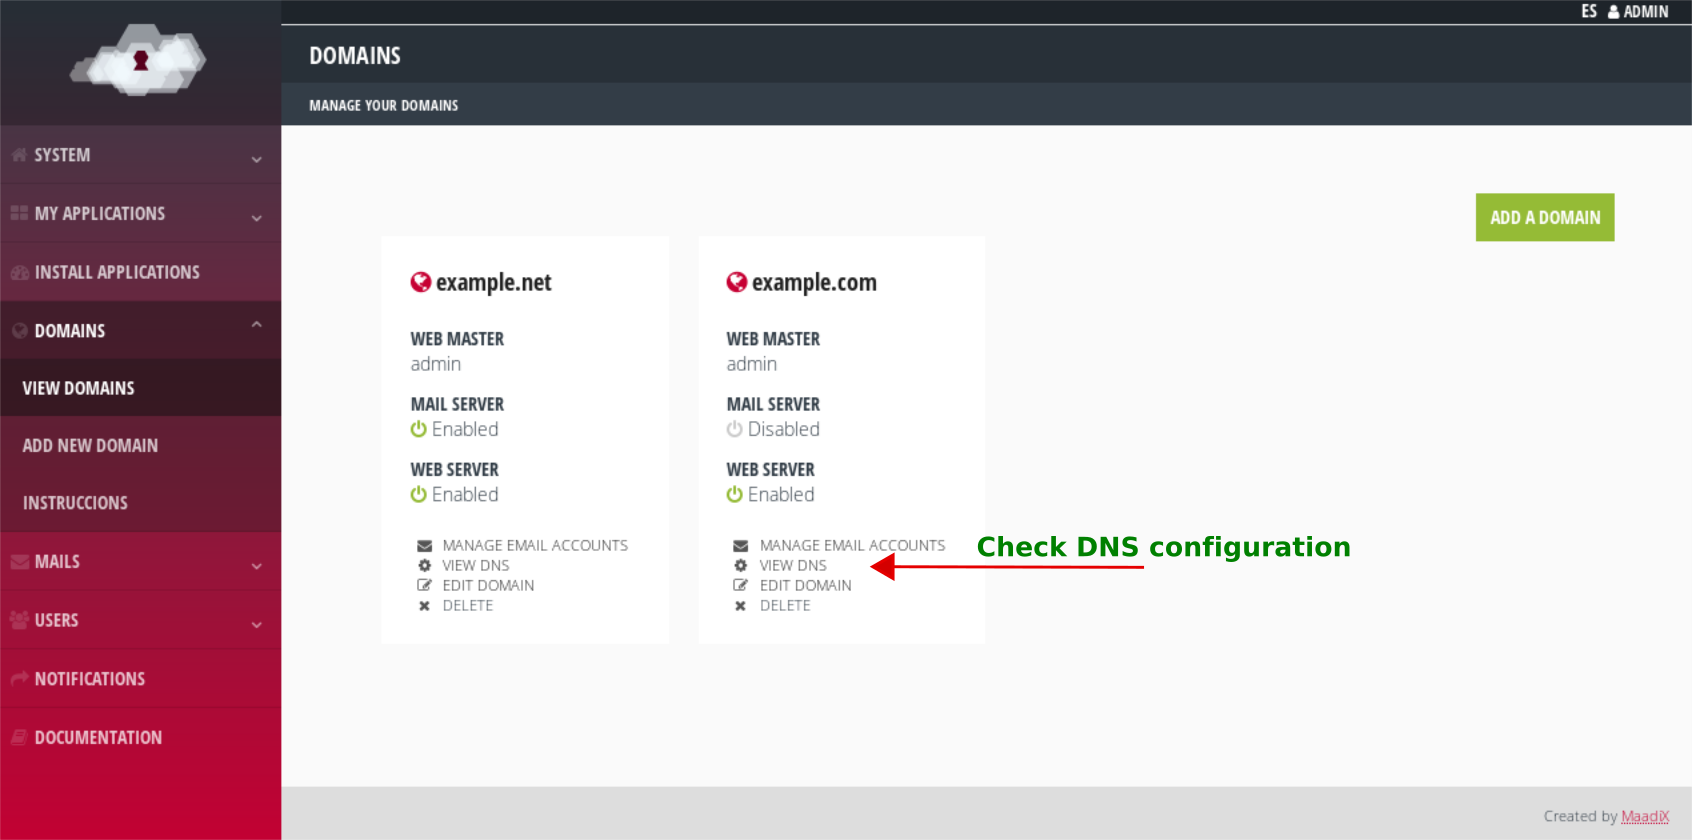
View DNS
You must enter this data in the corresponding section of the DNS configuration within the client area of your domain provider (this phase must be completed outside your MaadiX server). There will probably be a link or tab, perhaps in the menu, that says something like “DNS”, “Edit DNS” records or “Edit DNS zone”. You can check the DNS section for detailed instructions on the different types of records required for all services to work properly.
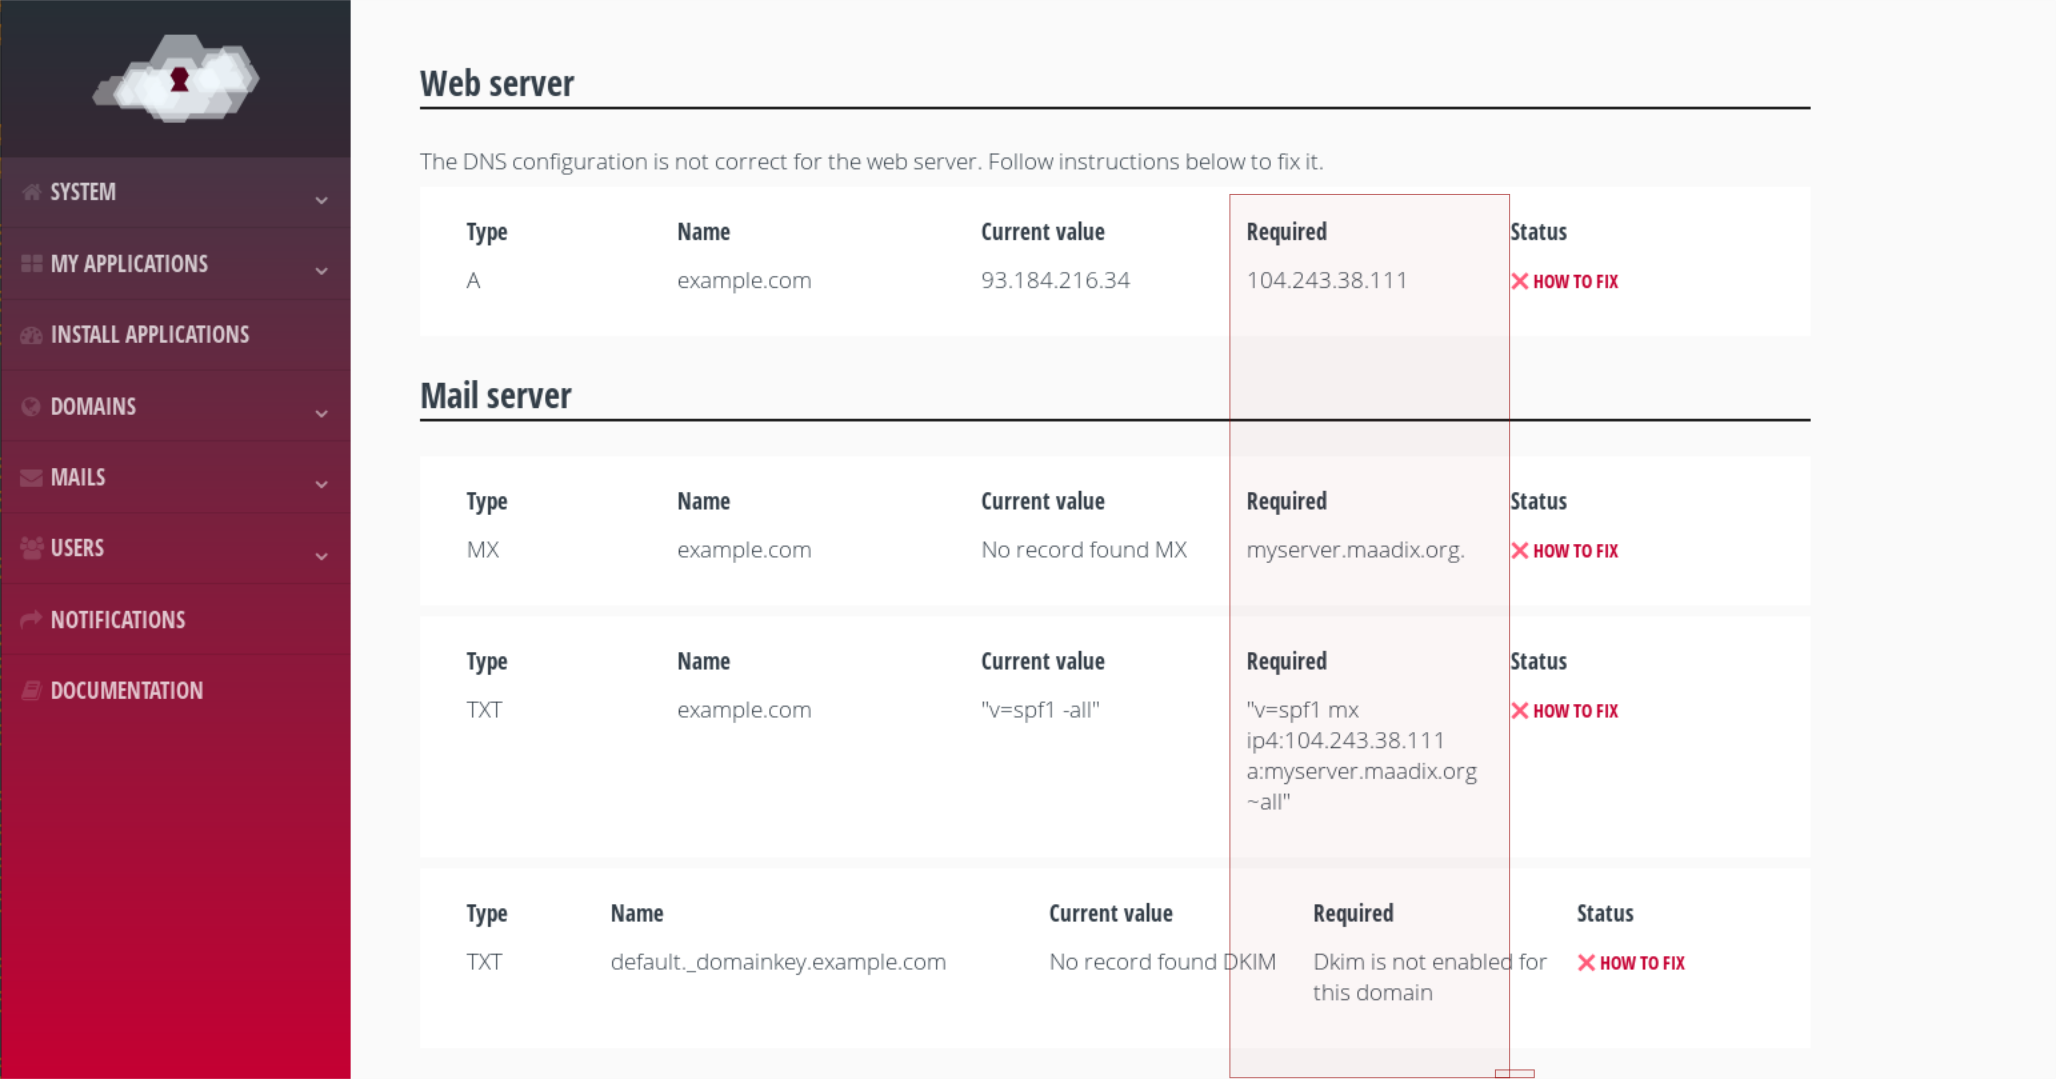
Required DNS
Una vez hechos los cambios, vuelve a consultar la página de configuración de DNS en el panel de control de tu servidor MaadiX, haciendo clic en “Ver DNS” en la columna del dominio. Recuerda que el proceso de propagación de los nuevos DNS puede tardar hasta 48 horas, de modo que es normal que durante un tiempo la configuración siga resultando incorrecta aunque la hayas cambiado.
HTTPS
All domains that you activate through the control panel will always have an SSL certificate activated and will be accessible through the address: https://yourdomain.com
The creation and configuration of certificates is automated and it is completed using Let’s Encrypt, along with the entire process of activating and configuring domains in your system.
No necesitas llevar a cabo ninguna configuración adicional para activar HTTPS para tu dominio. Los certificados tienen validez de tres meses y se renuevan automáticamente.
Upload your website or application to your own domain
Once the green icon “Enabled” appears for your domain’s web server, you can upload your web application files to the newly created /var/www/html/example.com/ folder. You can do this very easily with an SFTP client (for example, Filezilla). Once they are there, you can visit them from the browser in your example.com domain.
You can find more instructions here: create your website or application.
Start using your email server
If you have checked the box ‘Enable mail server for this domain’, you can also start using your email server. Go to the Mail Accounts section to open new accounts by clicking on the ‘Add a new account’ button at the top right of this page. Remember that the MX and SPF records have to be correctly configured to point to your server.
You can find more guidelines here: create and manage email accounts.