Domains
First step: get your domain
In order to install applications you need to have your own domain. With a single domain you can create different subdomains, one for each website or application you want to install.
If you don’t have your own domain yet, here are some sample providers where you can easily register it (but there are many more!):
Remember that MaadiX is not a domain provider and does not offer a DNS zone editor.
The MaadiX control panel has two different sections that work with domains, and it is important not to confuse them:
Domains: activates a domain by creating a Vhost with a Let’s Encrypt SSL certificate, and also allows you to create email accounts for that domain.
Install applications: automatically installs applications such as Jitsi Meet, RocketChat, Only Office Online, Collabora Online, Discourse, Mailtrain, etc. During the installation you are asked to specify the domain where the application will be installed.
Common mistake: adding the domain first in the ‘Domains’ section and, afterwards, trying to use that same domain to install an application. The system does not allow this, because the domain is already in use, and the installation cannot be carried out.
That’s why, if your goal is to install an application automatically, do not add it beforehand in the ‘Domains’ section: specify it directly in the corresponding field of the installation form, as shown here.
You only need to activate the domain from the ‘Domains’ section if you want to create your own Vhost (for example, to upload a website manually) and/or set up email accounts for that domain.
In the case of mailing lists, domains need to be added through Mailman, as indicated here.
Activate your domain
To activate a domain you have to go to your control panel, to the section ‘Domains’ -> ‘Add a new domain’.
A form divided into three sections will be displayed:
Web: all the information needed to activate the web server and to to make the domain accessible from any browser. It includes the option to install Wordpress in an automated way.
Permissions: to grant read/write permissions to an account, normally the person in charge of the development/maintenance of the web application.
E-mail: activation and configuration of the e-mail server
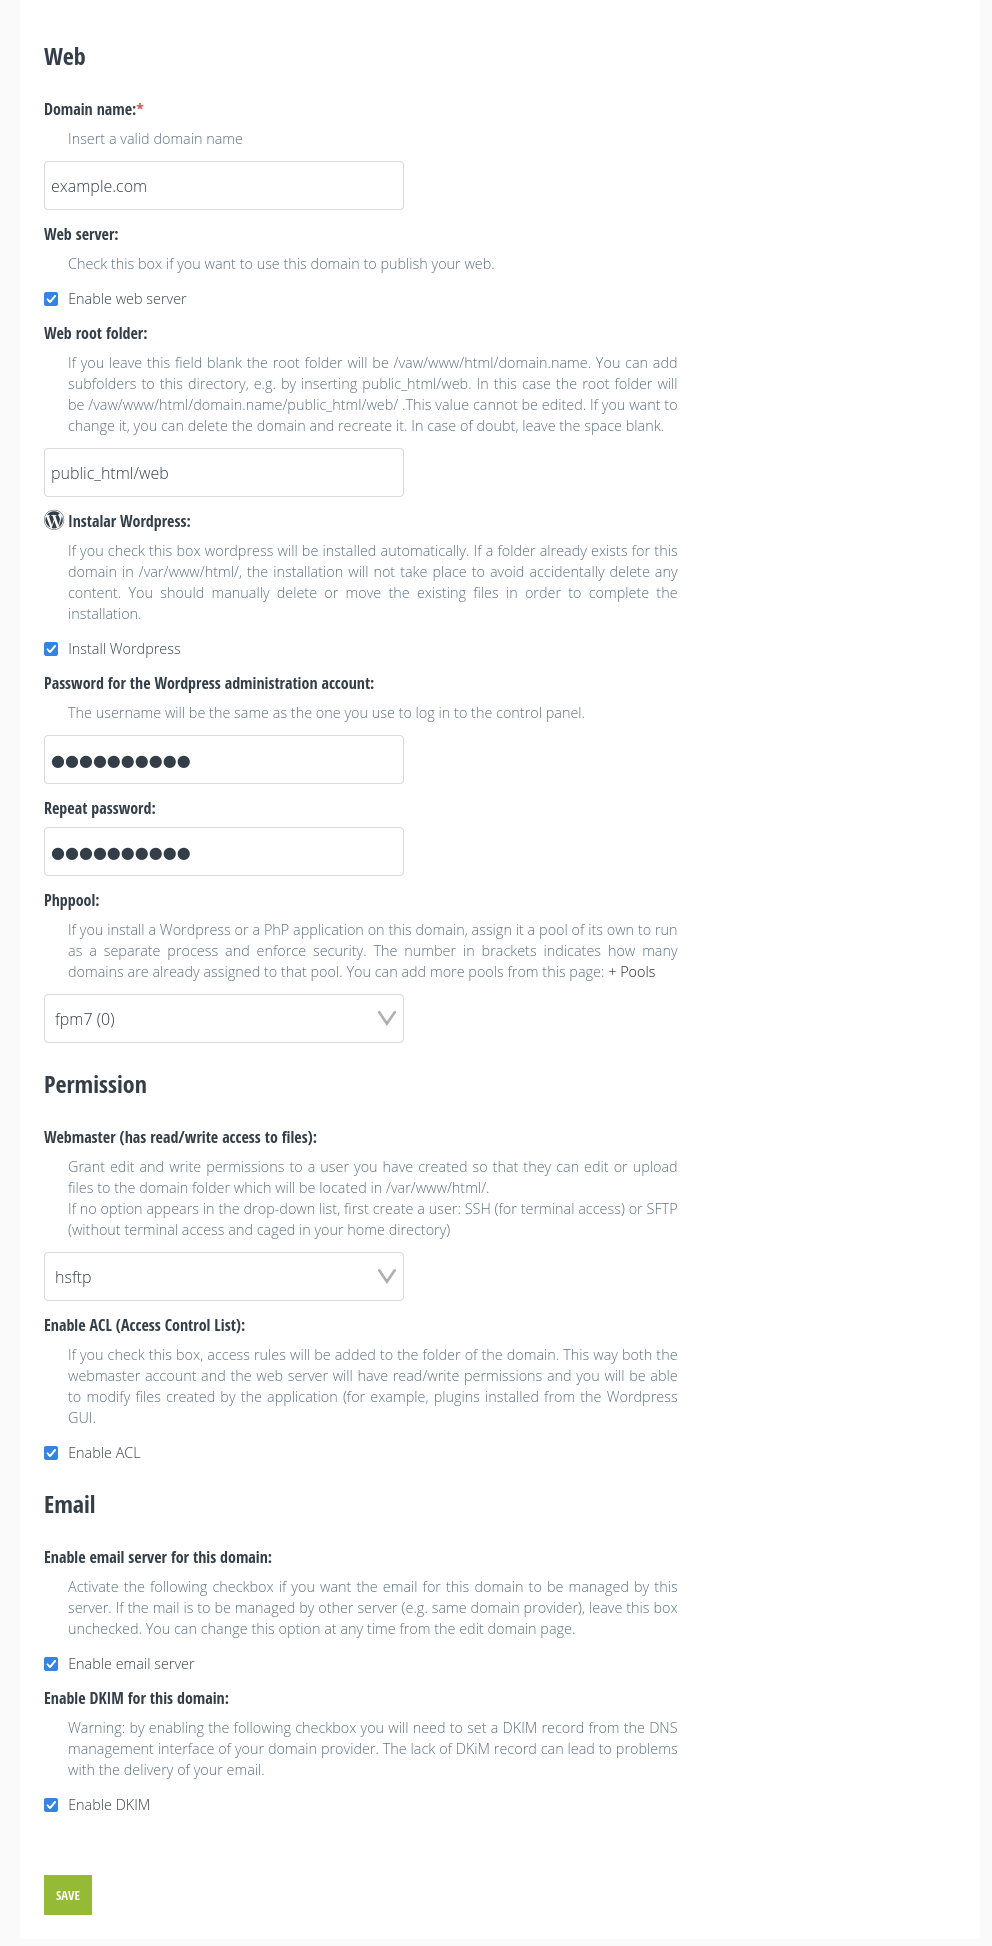
Adding a domain
The available fields and their functionality are described below.
Web
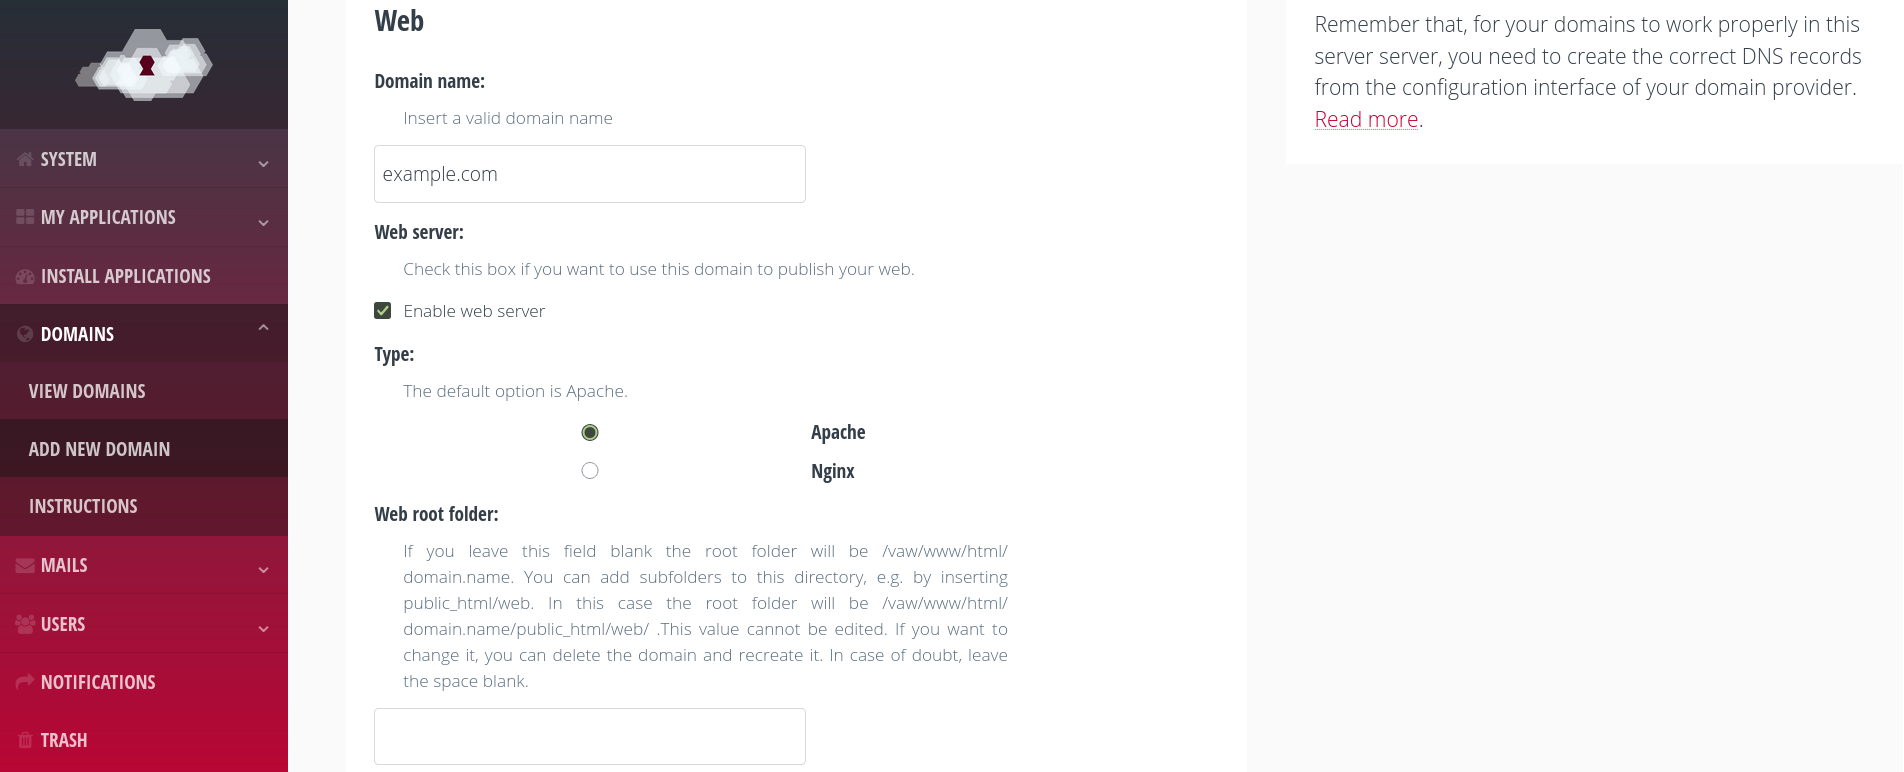
Adding a domain, web section
Domain name: enter the full name of your domain or sub-domain (for example: example.com or docs.example.com).
For each domain or subdomain you activate, a folder will be created on your server located at /var/www/html/example.com/. You must upload your website or application to this folder so that it is accessible from the browser by visiting example.com
Enable Web Server: activating this checkbox will create the configuration necessary for the domain to be accessible from any browser. In the event that you only want to use the domain for email accounts and host the website on another server, leave this box unchecked. Please note that you will only be able to activate the web server if the DNS for this domain is pointing to the server’s IP.
This is because all domains are activated with https by default by creating the certificates with Let’s Encrypt. If there is no correspondence between the server IP and the DNS record of type A, the creation of the certificate creation will fail.
If you have doubts about how to create the necessary DNS record, see the section Configure your domain’s DNS to point to your server of this page.
If your server has Nginx installed, when you activate the web server the option to choose between Apache or Nginx will appear. In short, Apache offers greater compatibility (for example with .htaccess files), while Nginx is lighter and faster at serving static content and under high concurrency.
Document Root:
Leave this field blank so that the root folder will be /var/www/html/example.com/. In case you need to separate the root folder from other files you can add subfolders to this directory, for example by inserting public_html/web. In this case the root folder will be /var/www/html/example.com/public_html/web/ and that is where you would have to place the web files. This value can’t be edited so if you want to change it you would have to delete the domain and recreate it.
In case of doubt, leave the field empty for a standard configuration.

Install Wordpress
Install Wordpress: Checking this box will install Wordpress in an automated way. In this case, two fields will appear for you to enter the password that you will need to access the administration panel once the installation is complete. Please note that Wordpress can only be installed if the web server can be activated ( that is, if you have checked the box above and the DNS are properly configured) and if the Document Root folder is empty.
PhpPool: if you install a Wordpress or any other PHP application, we strongly recommend assigning it its own pool by selecting it from the drop-down list, instead of leaving it in the default shared pool.
Why is this so important? Think of each pool as a watertight compartment where a website runs. If several domains share the same pool and one of them suffers a problem, for example a security flaw, a faulty plugin or a traffic spike that consumes a lot of resources, that problem can end up affecting the rest of the websites that share that same pool, even if they have nothing to do with each other. By assigning each domain its own pool, you ensure that each website runs in an isolated and independent way, so that a problem in one of them cannot affect the others. It is, therefore, a simple measure that noticeably improves both the security and the stability of all your projects.
The number in parentheses next to the name of each pool indicates how many domains it already has assigned, to help you choose a free one or create a new one. You can add new pools from the ‘System’ -> ‘PHP-FPM Pools’ page.
More information on this functionality can be found on this page: PHP-FPM Pools
Permissions
Webmaster: this is the account that will manage the website’s files. You can assign a different webmaster account to each domain or subdomain you activate in MaadiX; it will be the account that you, or the person in charge of maintaining the website, will use to upload and modify its files.
Only an ordinary account that has SFTP or SFTP+SSH access enabled (the two ways of connecting to the server to upload and manage files) can be assigned as webmaster. When you click on the ‘Assign Webmaster’ drop-down list you will see all the accounts that meet this requirement.
If you don’t see any, you will have to create one first from the section ‘Users’ > ‘Regular accounts’. Here you can read more about the regular accounts and what SSH and SFTP access involves.
The webmaster account will have permissions to create, delete or modify files within the
/var/www/html/example.com/folder, which is where the web application is hosted.For security reasons, since version 201901 the Superuser account can no longer be assigned as webmaster (the account with maximum privilege over the entire server).
Enable ACL: we recommend always enabling this option, especially if you are going to install Wordpress or any application that is managed from an administration panel. Without ACL, it is very likely that at some point you will not be able to edit or delete, from your webmaster account, a file created by your own web application (for example, an image uploaded from the Wordpress editor). ACL automatically avoids this permissions problem.
The only reason to leave it disabled is if, for security reasons, you prefer the web server not to have write permission on the files, for example if you deploy the website using git or a continuous integration system and want to prevent anything from modifying it outside of that process.
Why can this happen? When you upload files by hand with the webmaster account (via SFTP or SSH), those files are “owned by” that account. But when it is the application itself that creates files automatically, for example when uploading an image from its editor or installing a plugin from its administration panel, those files are “owned by” another system account: the one used by the web server to run (usually called
www-data). The result is that your webmaster account may come across files that it can see, but cannot modify or delete.By enabling ACL, both your webmaster account and the web server’s account receive read and write permission on all the domain’s files, regardless of which of the two created them. This way you will be able to edit them without problems, whether you upload them manually or the application itself generates them.
Email
Enable mail server for this domain: If you want to use the internal mail server for the domain you are creating, this option has to be enabled. Otherwise, if you want the email to be managed by another external server, leave it off. You can change this option at any time from the domain editing page.
Activate DKIM: if you activate the mail server it is highly recommended that you also activate this checkbox to ensure that the emails you send are not treated as SPAM. If you activate it you will also have to create an additional DNS record. See the instructions page for DNS configuration for more details.
Configure the DNS to point to your server
To find out if the domain activation and configuration process has been successfully completed, check the Web Server icon on the View Domains page. If the icon is green (Activated) the configuration to be able to create a website has been carried out successfully.

Web server enabled
In order to have your domain pointing to your server, you must modify its DNS. DNS (Domain Name System) servers are those that transform domain names, designed for human understanding, into numbers that correspond to the IP addresses of the different machines connected and publicly accessible on the Internet.
By clicking on “View DNS” in the column of your domain, you will find the settings required to make your domain work for both your web application (A Record) and your mail server (MX, SPF and DKIM Records).

View DNS
You must enter this data in the corresponding section of the DNS configuration within the client area of your domain provider (this phase must be completed outside your MaadiX server). There will probably be a link or tab, perhaps in the menu, that says something like “DNS”, “Edit DNS” records or “Edit DNS zone”. You can check the DNS section for detailed instructions on the different types of records required for all services to work properly.
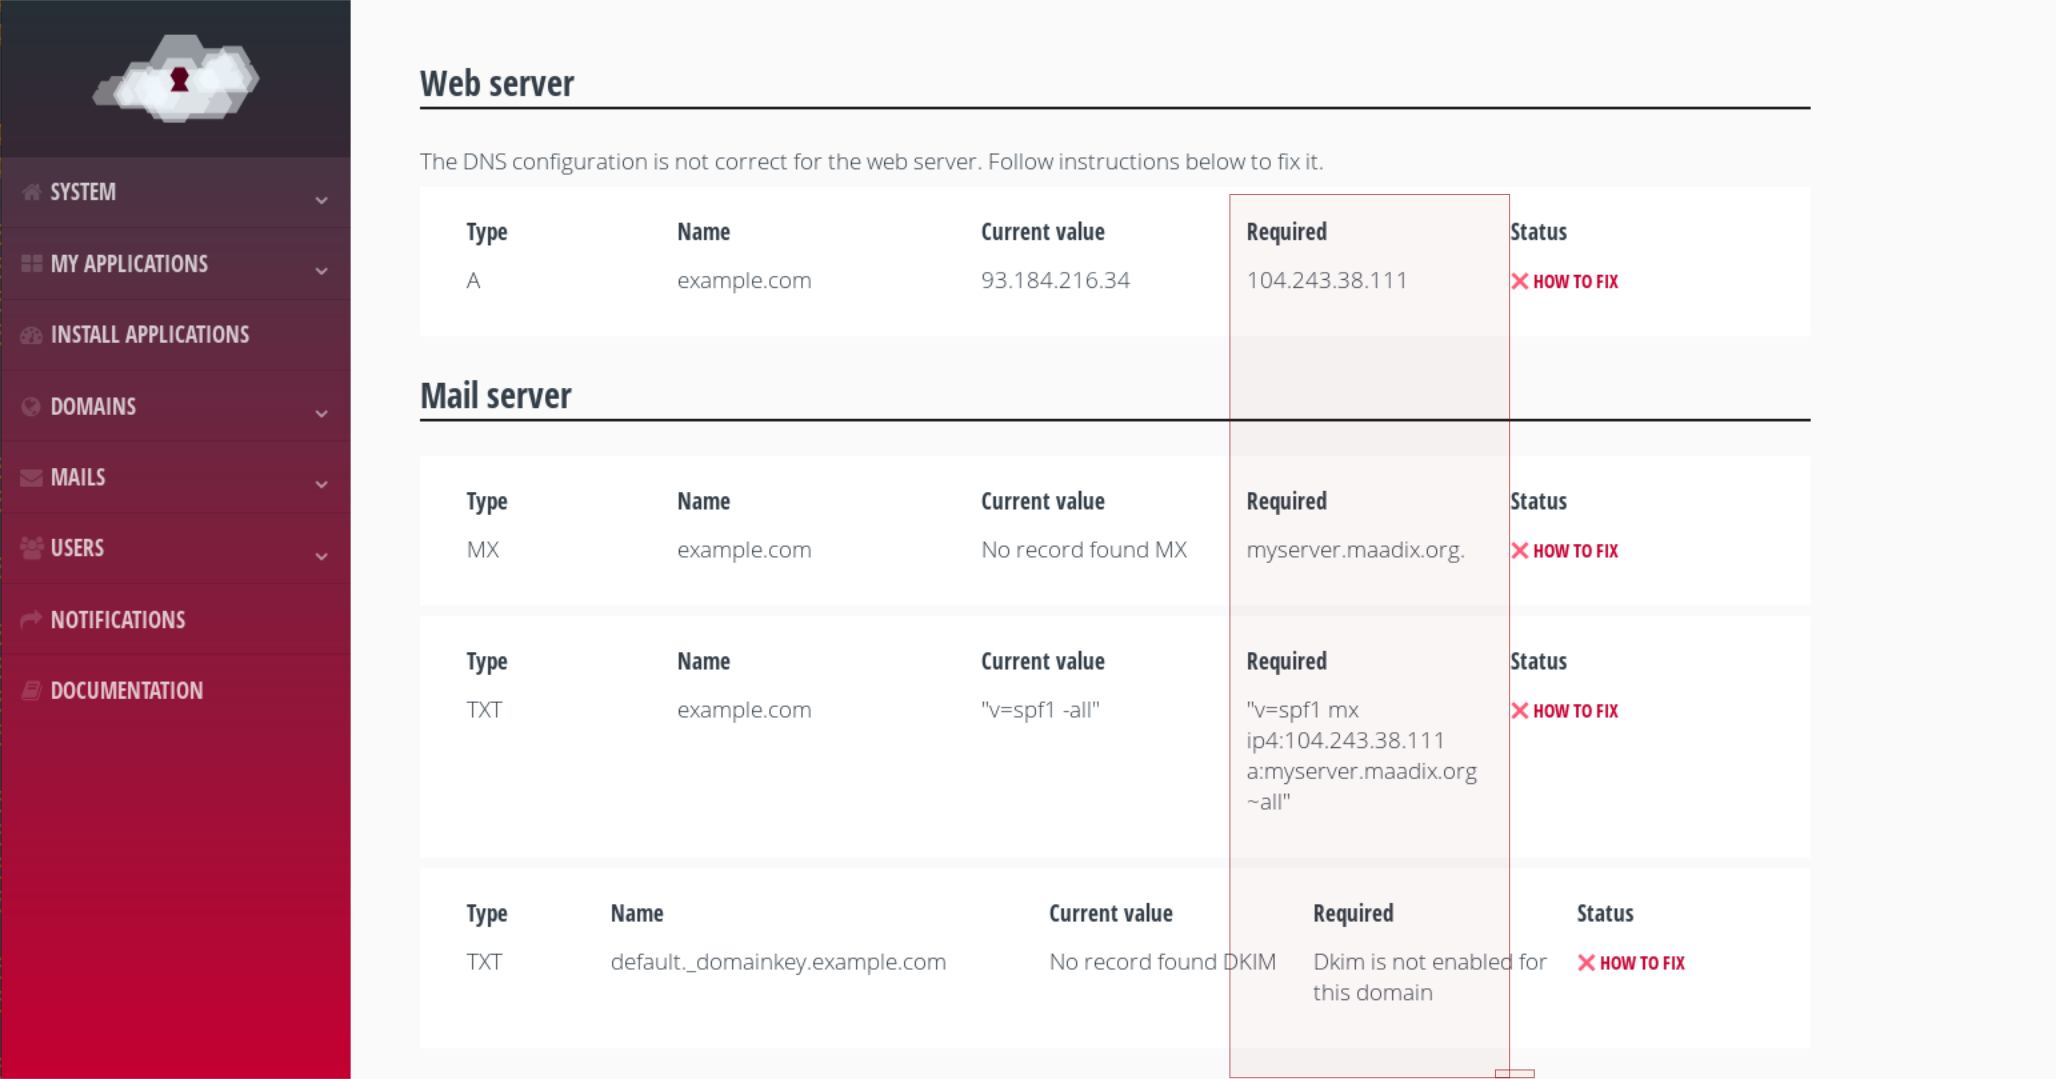
Required DNS
Once you have made the changes, check the DNS configuration page again in your MaadiX server’s control panel, by clicking on “View DNS” in the domain’s column. Remember that the propagation of the new DNS records can take up to 48 hours, so it is normal for the configuration to still appear incorrect for a while even though you have already changed it.
HTTPS
All domains that you activate through the control panel will always have an SSL certificate activated and will be accessible through the address: https://yourdomain.com
The creation and configuration of certificates is automated and it is completed using Let’s Encrypt, along with the entire process of activating and configuring domains in your system.
You don’t need to carry out any additional configuration to activate HTTPS for your domain. Certificates are valid for three months and are automatically renewed.
Upload your website or application to your own domain
Once the green icon “Enabled” appears for your domain’s web server, you can upload your web application files to the newly created /var/www/html/example.com/ folder. You can do this very easily with an SFTP client (for example, Filezilla). Once they are there, you can visit them from the browser in your example.com domain.
You can find more instructions here: create your website or application.
Start using your email server
If you have checked the box ‘Enable mail server for this domain’, you can also start using your email server. Go to the Mail Accounts section to open new accounts by clicking on the ‘Add a new account’ button at the top right of this page. Remember that the MX and SPF records have to be correctly configured to point to your server.
You can find more guidelines here: create and manage email accounts.