Mumble
Mumble is a very useful application to be able to do online meetings. It is not a video conferencing application as it only offers audio and text options. However, due to its great sound quality and low latency it is a very suitable tool for large meetings. It includes moderation and turn-taking functionalities, among others. For its use, once the Mumble server is installed, it is necessary to have a client application to connect to the rooms. In this guide we show how to install both.
Installation
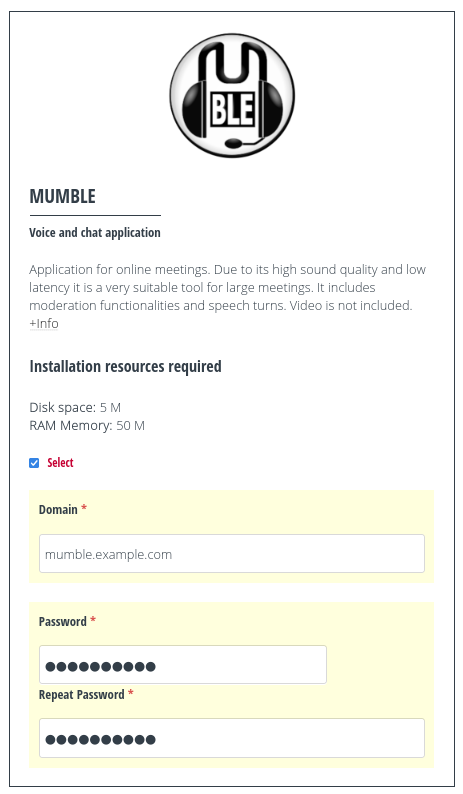
From the Control Panel, go to the ‘Install Applications’ section, there you will see all the applications available to be installed, including including Mumble. Just check the ‘Select’ box and indicate:
A domain or subdomain where you want to install it. This domain has to be pointing to the IP address of the server, for this you will have to add an A record in the DNS zone editor of your domain (external operation to MaadiX). Remember that this domain or subdomain does not have to be added in the “Domains” section.
A password to assign to the Etherpad administration account. Keep it somewhere safe as it will not be mailed for security reasons.
Once you have specified these two parameters, you can click on the button ‘Install’ button.
Mumble installation
After a few minutes you will receive an email (to the address you have configured for the Control Panel administration account) confirming that the installation was successfully completed.
Changing the domain
If you need to change the domain or subdomain of Mumble, just go to the Control Panel and in “My applications” > “Mumble” > “Settings” indicate the new domain. This domain has to be pointing to the IP address of the server, for this you will have to add an A record in the DNS zone editor of your domain (external operation to MaadiX). Remember that this domain or subdomain does not have to be added in the ‘Domains’ section.
Connect to Mumble
To make use of Mumble you need to install a client application. The installation method depends on the operating system you are using.
Linux: Most distributions include Mumble in their repositories, so it will be sufficient to launch the command:
sudo apt-get update && apt-get install mumbleWindows or MacOS: download the application from the official website by clicking on the icon of the desired operating system. Download Mumble Client
The first time you open the application you will be guided through a sound configuration process that allows you to optimize the input and audio output.
Una vez terminado tendrás configurar los parámetros de conexión al servidor Mumble recién instalado. Para ello haz clic en ‘Servidor’ > ‘Conectar’ > ‘Agregar Nuevo’.
There are two ways to connect to the server: with the administration account (superUser) or with an unprivileged account.
In both cases a window will be displayed in which you will have to enter the parameters.
To connect to an unprivileged account
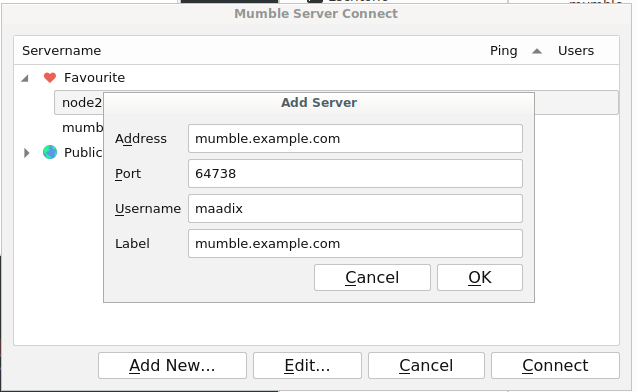
Connect to mumble server
The parameters are as follows:
Dirección: el dominio/subdominio en el que instalaste mumble. En nuestro ejemplo mumble.example.com
Puerto: el que hay por defecto (64738)
Nombre de Usuarix: un nombre de tu elección. Será el nombre que aparecerá privilegios en las salas cuando te conectes
Etiqueta: Un nombre cualquiera para distinguir esta conexión de otras.
To connect as SuperUser
In this case instead of any name you will have to insert ‘SuperUser’ in the ‘Username’ field . An additional field for the password will appear in which you will have to enter the same you entered during the installation.
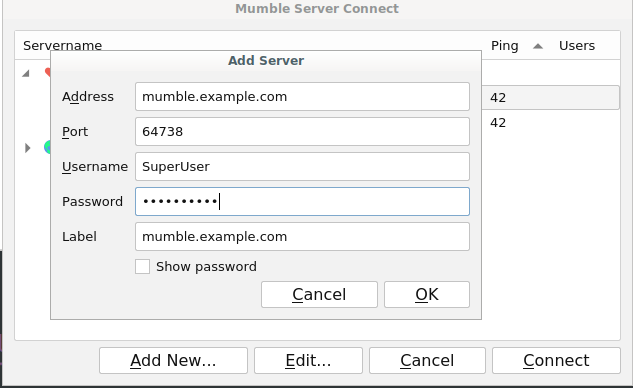
Connect to mumble server as superuser
If you log in as SuperUser you will have privileges to setup advanced connection parameters.
Creating rooms
By default there is a room created whose name is Root. The SuperUser account can create rooms that will appear in the list of available rooms each time someone connects to the server.
Rooms can be public or password protected.
The Supersuser account also has the ability to ban users, create access rules for rooms and many other settings that are beyond the scope of this small guide.
If you want to learn more about all the available options we recommend you to check its official documentation - Guides: https://www.mumble.coma/mumble-server-support.php - Wiki: https://wiki.mumble.info/wiki/Main_Page